こんにちは。X(クロス)イノベーション本部 ソフトウェアデザインセンター セキュリティグループの耿です。
インフラをIaC化している環境において、AWS Security Hub のアラート管理方法についてのお話です。
AWS Security Hubのセキュリティ基準を有効にすると、作成したリソースを基準に沿ってチェックし、アラートを上げてくれます。
Security Hubのセキュリティ基準は細かい設定までチェックしたりするので、数百〜数千のアラートが上がる場合があり、その対応に苦労している開発者が多いようです。アラートの数が多いと、Security Hubのコンソールから新規のアラートを探すのが難しいため、AWS外部へチャット通知したりチケットを起票したりする運用をよく見かけます。
さて、インフラリソースをCDKなどでIaC化している場合、それに対するアラートはAWSで発生している問題ではなく、コードで発生している問題といえます。コードで発生している問題は、コードリポジトリで管理するのが良いでしょう。
そこで「CDKでインフラリソースをIaC化している」「GitHubリポジトリでIaCを管理している」という前提の下、Security Hub のアラートを GitHub Issues に起票する仕組みを作成してみます。
仕組みの全体像

Security Hubで検知されたアラートはEventBridgeルールで受け取ることができます。AWS HealthやGuardDutyなど他のサービスからのアラートも送信されるため、ここで欲しいアラートをフィルタリングします。
イベントの送信先をLambda関数とします。パラメータストアにGitHub Appのトークンを生成するための秘密鍵などを保存しておき、GitHub Appのトークンを取得してGitHubリポジトリにIssueを作成します。Issue作成が成功したらSecurity Hubアラートのワークフローステータスを NOTIFIED に変更します。
もちろんこの仕組みを構成するAWSリソースもなるべくCDKで作成し、自分自身に対するアラートもIssue化するようにします!
インフラコード本体とその問題点を同じGitHubリポジトリで管理できるため、問題の管理と修正を追跡しやすくなります。インフラを構築する初期段階からこの仕組みを作っておくのがおすすめで、リソースの作成・修正に伴うアラートを素早く認識でき、開発へのフィードバックが容易になるでしょう。
作成手順
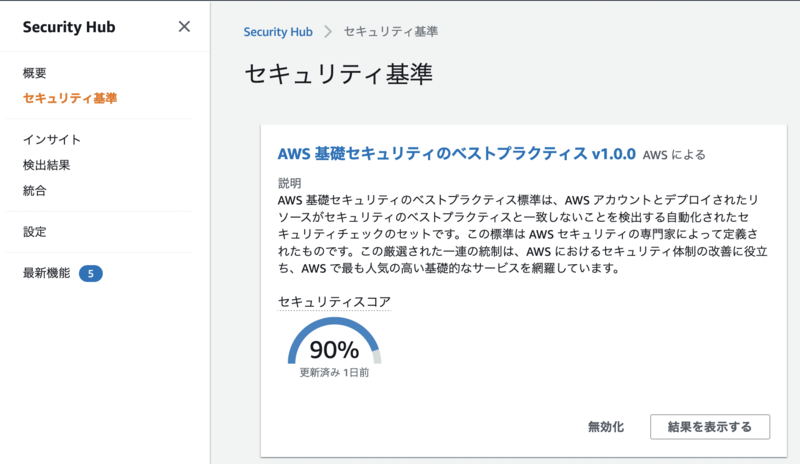
Security Hub とセキュリティ基準を有効にする
Security Hubとセキュリティ基準は手動で有効にします。今回は「AWS 基礎セキュリティのベストプラクティス」を利用します。
GitHub リポジトリで Issues を有効にする
IaCを管理するGitHubリポジトリでIssues機能を有効化していない場合、有効にします。
リポジトリのSettings > General > Features で設定できます。

GitHub Appを作成する
GitHub REST APIを利用するためにPersonal Access Tokenを使う方法もありますが、個人に紐づくトークンではなく、BotユーザーとしてAPIコールをしたいため、GitHub Appを作成します。
詳細は割愛し、ここでは概要だけ説明します。
- 組織アカウントを利用している場合、以下のURLからGitHub Appを新規作成する(組織のオーナー権限が必要)。作成後、App IDが画面に表示されるのでメモしておく
https://github.com/organizations/[organization名]/settings/apps
- 権限は
IssuesのRead and writeを許可する。(自動的にMetadataのRead-onlyも許可される)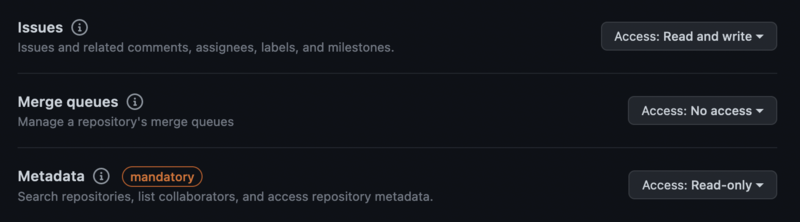
- GitHub App作成後の画面から秘密鍵を生成し、ダウンロードする
- 作成したGitHub Appを対象リポジトリにインストールする。インストール後、以下のリンクからAppを選択すると、Installation IDがURLパスに表示されるのでメモしておく
https://github.com/organizations/[organization名]/settings/installations
パラメータストアに必要なパラメータを登録する
AWS Systems Manager のパラメータストアに、以下のパラメータを登録します
/github/GITHUB_APP_ID: GitHub Appの App ID/github/GITHUB_APP_INSTALLATION_ID: GitHub Appの Installation ID/github/GITHUB_APP_PRIVATE_KEY: ダウンロードした秘密鍵ファイルの中身。SecureStringとして登録する
CDKスタックを作成する
以下のとおりスタックを作成します。 props でAWSアカウントID、デプロイ先のリージョン、GitHubリポジトリのオーナー(組織)名、リポジトリ名をもらっています。
import { Duration, Stack, StackProps } from "aws-cdk-lib";
import * as events from "aws-cdk-lib/aws-events";
import * as eventTargets from "aws-cdk-lib/aws-events-targets";
import * as iam from "aws-cdk-lib/aws-iam";
import { Runtime } from "aws-cdk-lib/aws-lambda";
import * as lambdaNodejs from "aws-cdk-lib/aws-lambda-nodejs";
import { Construct } from "constructs";

export interface Props extends StackProps {
  accountId: string;
  region: string;
  githubOwner: string;
  githubRepoName: string;
}

export class GitHubIssueStack extends Stack {
  constructor(scope: Construct, id: string, props: Props) {
    super(scope, id, props);

    // Lambda関数実行ロール用のIAMポリシー
    // パラメータの取得と、Security Hub検出結果の更新を許可する
    const createGithubIssueFunctionPolicy = new iam.ManagedPolicy(this, "CreateGithubIssueFunctionPolicy", {
      managedPolicyName: "CreateGithubIssueFunctionPolicy",
      statements: [
        new iam.PolicyStatement({
          resources: [`arn:aws:ssm:${props.region}:${props.accountId}:parameter/github/*`],
          actions: ["ssm:GetParameter"],
          effect: iam.Effect.ALLOW,
        }),
        new iam.PolicyStatement({
          resources: ["*"],
          actions: ["securityhub:BatchUpdateFindings"],
          effect: iam.Effect.ALLOW,
        }),
      ],
    });

    // Lambda関数
    // 環境変数にGitHubリポジトリのオーナー名とリポジトリ名を渡す
    const createGithubIssueFunction = new lambdaNodejs.NodejsFunction(this, "CreateGithubIssueFunction", {
      entry: "functions/create-github-issue.ts",
      runtime: Runtime.NODEJS_16_X,
      timeout: Duration.minutes(5),
      environment: {
        GITHUB_OWNER: props.githubOwner,
        GITHUB_REPO: props.githubRepoName,
      },
      description: "Create GitHub Issue from EventBridge Security Hub events and update finding's workflow status",
      bundling: { forceDockerBundling: false },
    });
    createGithubIssueFunction.role?.addManagedPolicy(createGithubIssueFunctionPolicy);

    // EventBridgeルール。イベントパターンのフィルタリングを行う
    // ここではコンプライアンスステータス、製品名、レコートの状態、ワークフローステータスでフィルタリングしているが、アラートの重要度などをフィルタリング条件に追加することもできる
    // ワークフローステータスを NEW に限定することで、NOTIFIED に変更されたアラートを再度通知しないようにする
    new events.Rule(this, "SecurityHubEventRule", {
      ruleName: "security-hub-findings",
      eventPattern: {
        source: ["aws.securityhub"],
        detailType: ["Security Hub Findings - Imported"],
        detail: {
          findings: {
            Compliance: {
              Status: ["FAILED"],
            },
            ProductName: ["Security Hub"],
            RecordState: ["ACTIVE"],
            Workflow: {
              Status: ["NEW"],
            },
          },
        },
      },
      targets: [new eventTargets.LambdaFunction(createGithubIssueFunction)],
    });
  }
}
Lambda関数を作成する
functions/create-github-issue.ts に以下のようにLambda関数を実装します。
GitHubのトークンを取得するためには秘密鍵からJWTを生成し、GitHubにリクエストを投げる必要があるため、jsonwebtoken パッケージを利用しています(TypeScriptの場合 @types/jsonwebtoken もインストール)。リクエストには axios パッケージを利用しています。
また、GitHubのIssue作成は Octokit(@octokit/rest パッケージ)からリクエストを投げています。
import {
  SecurityHubClient,
  BatchUpdateFindingsCommand,
  BatchUpdateFindingsCommandInput,
  WorkflowStatus,
} from "@aws-sdk/client-securityhub";
import { SSMClient, GetParameterCommand } from "@aws-sdk/client-ssm";
import { Octokit } from "@octokit/rest";
import { Handler, EventBridgeEvent } from "aws-lambda";
import axios from "axios";
import { sign } from "jsonwebtoken";

export const handler: Handler = async (event: EventBridgeEvent<string, Detail>) => {
  // GitHubのAccess Tokenを取得する関数
  const token = await getGitHubToken();
  const octokit = new Octokit({ auth: token });

  await Promise.all(
    event.detail.findings.map(async (finding) => {
      try {
        // 作成するIssueのボディテキスト
        const body = `## ${finding.Title}
* Security Hub コントロールID: \`${finding.ProductFields.ControlId ?? finding.Compliance.SecurityControlId ?? ""}\`
* 重要度: \`${finding.Severity.Label}\`
* 説明: ${finding.Description}
* リージョン: \`${finding.Region}\`
* リソースID: ${finding.ProductFields["Resources:0/Id"]}
* 対応方法: ${finding.ProductFields.RecommendationUrl ?? finding.Remediation.Recommendation.Url}
* 最初の観測日時: ${finding.FirstObservedAt}
* ID: \`${finding.Id}\``;

        // Issueを作成
        const res = await octokit.request(`POST /repos/${process.env.GITHUB_OWNER}/${process.env.GITHUB_REPO}/issues`, {
          owner: process.env.GITHUB_OWNER,
          repo: process.env.GITHUB_REPO,
          title: finding.Title,
          body: body,
          labels: ["Security Hub"],
        });

        if (res.status === 201) {
          console.log(`Issue created. [ID]${finding.Id}`);
          // Issueの作成が成功したら、検出結果のワークフローステータスを変更する
          await setFindingNotified(finding.Id, finding.ProductArn);
        } else {
          console.error(`Issue creation failed. [ID]${finding.Id} [Status]${res.status}`);
        }
      } catch (e) {
        console.error(`Issue creation failed. [ID]${finding.Id} [Message]${e instanceof Error ? e.message : ""}`);
      }
    })
  );
};
イベントの型は以下のとおり定義しています。ほぼ全フィールドを網羅していますが、使用するフィールドのみを定義しても良いでしょう。
(2023/2/28追記)Security Hubの検出結果の集約機能が利用可能になり、一部のフィールドが削除される場合があります。これに合わせてフィールド定義を修正しました。
type Detail = {
  findings: Finding[];
};

type Finding = {
  SchemaVersion: string;
  Id: string;
  ProductArn: string;
  GeneratorId: string;
  AwsAccountId: string;
  Types: string[];
  FirstObservedAt: string;
  LastObservedAt: string;
  CreatedAt: string;
  UpdatedAt: string;
  Severity: { Normalized: number; Label: string; Product?: number; Original: string };
  Title: string;
  Description: string;
  Remediation: { Recommendation: { Text: string; Url: string } };
  ProductFields: {
    StandardsArn?: string;
    StandardsSubscriptionArn?: string;
    ControlId?: string;
    RecommendationUrl?: string;
    "RelatedAWSResources:0/name": string;
    "RelatedAWSResources:0/type": string;
    StandardsControlArn?: string;
    "aws/securityhub/ProductName": string;
    "aws/securityhub/CompanyName": string;
    "Resources:0/Id": string;
    "aws/securityhub/FindingId": string;
  };
  Resources: { Type: string; Id: string; Partition: string; Region: string; Details: any }[];
  RecordState: string;
  WorkflowState: string;
  Workflow: { Status: string };
  Compliance: { Status: string; SecurityControlId?: string };
  ProductName: string;
  CompanyName: string;
  FindingProviderFields: {
    Types: string[];
    Severity: { Normalized: number; Label: string; Product: number; Original: string };
  };
  Region: string;
};
async function getGitHubToken(): Promise<string> {
  // App IDを取得
  const appId = await getParameter("/github/GITHUB_APP_ID", false);
  const payload = {
    iat: Math.floor(Date.now() / 1000) - 10,
    exp: Math.floor(Date.now() / 1000) + 60,
    iss: appId,
  };

  // 秘密鍵を取得
  const privateKey = await getParameter("/github/GITHUB_APP_PRIVATE_KEY", true);
  // 秘密鍵を含んだJWTを生成
  const token = sign(payload, privateKey, { algorithm: "RS256" });

  // Installation Idを取得
  const installationId = await getParameter("/github/GITHUB_APP_INSTALLATION_ID", false);
  // GitHub Access Tokenをリクエスト
  const res = await axios.post<{ token?: string }>(
    `https://api.github.com/app/installations/${installationId}/access_tokens`,
    null,
    {
      headers: {
        Authorization: "Bearer " + token,
        Accept: "application/vnd.github+json",
      },
    }
  );

  if (res.data.token) {
    return res.data.token;
  } else {
    throw new Error("Failed to get access token");
  }
}

const ssmClient = new SSMClient({ region: process.env.AWS_REGION });

// パラメータストアからパラメータを取得する関数
async function getParameter(name: string, encrypted: boolean): Promise<string> {
  const input = {
    Name: name,
    WithDecryption: encrypted,
  };
  const command = new GetParameterCommand(input);
  const ssmRes = await ssmClient.send(command);
  const param = ssmRes.Parameter?.Value;

  if (!param) {
    throw new Error(`Failed to get ${name} from SSM parameter store`);
  }
  return param;
}
Issueを作成したアラートのワークフローステータスをNOTIFIEDに変更する関数です。
const securityHubClient = new SecurityHubClient({ region: process.env.AWS_REGION });

async function setFindingNotified(findingId: string, productArn: string) {
  const params: BatchUpdateFindingsCommandInput = {
    FindingIdentifiers: [{ Id: findingId, ProductArn: productArn }],
    Workflow: { Status: WorkflowStatus.NOTIFIED },
  };
  const command = new BatchUpdateFindingsCommand(params);
  await securityHubClient.send(command);
}
完成
以上で完成です。スタックをデプロイしてみると、早速このスタックに対して CloudFormation.1 という Issue が作成されました。便利な修復方法のリンクもイベント内容に含まれているので、Issue内容に追加しています。
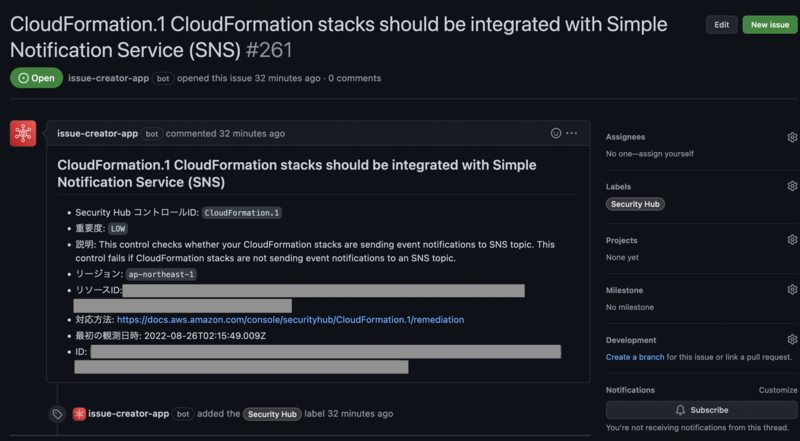
あとは開発チームの問題管理フローで対応していけば良いですね。
さいごに
ここまで紹介した仕組みではIssueの作成までを自動化し、Issueのクローズは手動でする必要があります。
作成されたIssue IDと検出結果IDの関連を DynamoDBテーブルなどに保管すれば、リソースの修正によって解決したIssueを自動でクローズする仕組みも作ることができそうです。
IaCで作成したリソースの問題点を見逃さずに適切に管理し、セキュアなインフラを作成していきましょう!
私たちは同じチームで働いてくれる仲間を大募集しています!たくさんのご応募をお待ちしています。
- セキュリティエンジニア(セキュリティ設計)
執筆:@kou.kinyo2、レビュー:@higa (Shodoで執筆されました)


